
One of the most commonly asked questions I get is “How do you make your lashes look so long?” and well, it’s kind of a multi-part answer. In my opinion, there are a few factors that come into play when talking all things lashes: genetics, products, and techniques. I have my momma to thank for my lengthy lashes and my dad to thank for the fullness (y’all should see my brother’s, they’re even crazier than mine.) I will say that the routine I’ve developed (with lots of trial and error over the years) makes all the difference. Whenever I’ve had my makeup done professionally (refuse to do this anymore haha), my lashes never look as long or as full. I say that to emphasize that not all lashes are created equal, and I totally get it, but these tips will help you make the most of your lashes no matter how long or short they may be to begin with!
I’ve never been a ‘falsies’ girl. To me, fake lashes are uncomfortable, time-consuming and mostly, just unnecessary. So, instead, I’ve spent the last few years perfecting the art of working with what I have! I’ve tested tons of products and techniques and am here today to share the best of the best with you guys! I’ve shared a few posts about lashes in the past that I will be linking throughout this one, but since I still get so many questions on the daily, I wanted to circle back with an update.
Think of today’s post as a lesson on how to help your lashes live their best life… and who doesn’t want that?!
There are three main steps when it comes to my lash success: curl, prime, and layer! Let me break it down…
1 // CURL
Curling your lashes will help open your eyes (making them looking wider and more awake). At the same time, raising your lashes up makes them look as long as possible. This only takes a few seconds, but it makes a huge difference. I personally curl my eyelashes before I apply mascara, but if you have super short lashes, you can try to give them a quick curl before and after to maximize the results! If you do curl them after you’ve applied mascara, only curl them for a second (you don’t need to hold it nearly as long this way) and don’t squeeze too hard so that you avoid any damage.

2 // PRIME
Primer is probably the most important step in the whole process! This one is my all-time favorite and has been for YEARS. If you’ve been following me for a long time, you’ve seen this little beauty in about a million blog posts and tutorials. Crazy enough, my mom and I have both been using this since I was in high school! Since then, I’ve tried several others and nothing compares! This one in particular helps to protect and condition your lashes while also making them thicker and longer – um, sign me up! See this post from last summer for an in-depth how-to on my favorite way to apply it. To summarize: fully coat your lashes from root to tip. Wait about 30 seconds then apply another layer, wait about 30 more seconds, and go in with your mascara. The timing doesn’t have to be exact, but basically you don’t want the primer to be totally wet (too slippery) or too dry because your mascara won’t lay right on top. Ideally, you want it a bit sticky so the mascara will adhere to it and do it’s thang!
3 // MIX + LAYER
Making what I like to call a mascara cocktail (the only cocktail I can have these days!) is my favorite way to custom create a formula that’s perfect for my lashes and what they need. I like to pick one mascara that lengthens and one mascara that thickens and use them both to get the best of both worlds! I like to switch up what I use, but thought it would be helpful to share a few of my all-time favorites. Whenever you guys ask, I’m usually wearing one of these! Of course it’s total personal preference, but I always do more than one coat! Layering is key.
In no particular order:
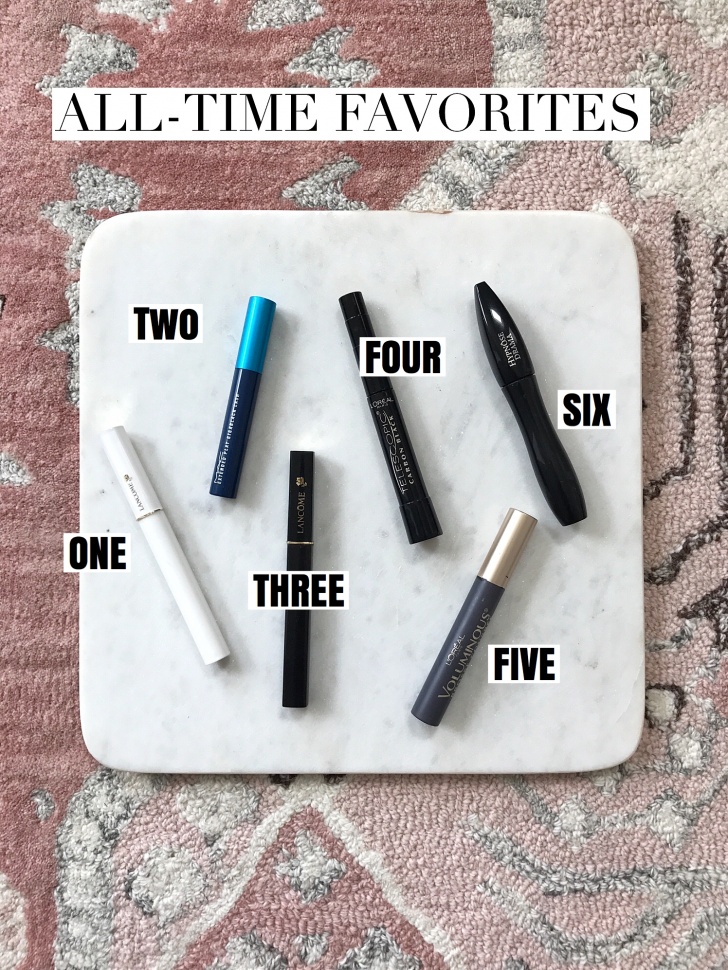
- THE best primer (see why I love it above)
- My favorite mascara for bottom lashes. It has a super tiny brush, so it coats all the individual lashes, and I don’t find that it bleeds under my eyes. BYOB tip: if you find that mascara bleeds no matter what you do, dust a little translucent powder at the tips of your bottom lashes to help prevent bleeding!
- This has been a favorite of mine since high school. I love it for a ton of reasons, but one of the main reasons is because it adds a lot of length!
- A drug-store favorite of mine, for all of my babes on a budget. This one is great because it really separates out the lashes and adds length.
- Another drug-store favorite – this is a great all-around mascara. I always make sure to get the curled brush because it really help lift my lashes!
- I’ve been using this one nonstop lately. The brush is extra fluffy and really adds a lot of volume and thickness.
4 // DITCH THE LINER
Recently, I’ve been skipping my normal winged eyeliner on the daily, and I’ve found that no liner actually makes my lashes look extra-long! I totally recommend trying this if you haven’t. If you are a total liner girl, try lining your upper waterline instead to add a little definition, while still getting a similar effect!
If you’re new, I hope this answers all your questions and helps you step up your lash game 🙂 and if you’re a longtime follower, consider this my update! I love hearing that you guys now use my routine and it works wonders for you!
What are your lash must-haves?